
Gadget
How to Remove a SIM Card from an Android Phone, A Comprehensive Guide
How to remove sim card from android phone – Unlock the secrets of SIM card removal from Android phones with our expert guide. This detailed analysis delves into the essential tools, safety precautions, and step-by-step instructions, empowering you to navigate this process with confidence and ease.
If you have a lot of tabs open on your Android phone and want to close them all at once, there are a few ways to do it. One way is to use the “Close all tabs” button in the Chrome browser.
To do this, open the Chrome browser and tap on the three dots in the top-right corner of the screen. Then, select “Close all tabs” from the menu that appears. Another way to close all tabs at once is to use the “Recent apps” button.
To do this, swipe up from the bottom of the screen to open the “Recent apps” menu. Then, tap on the “Close all” button in the top-right corner of the screen. For more detailed instructions, refer to this article.
Delve into the intricacies of SIM card extraction, ensuring the safety of your device and data throughout the procedure.
If you’re concerned about privacy and want to disable the camera on your Android phone, there are a few ways to do it. One way is to use the “Disable camera” option in the Android settings. To do this, open the Settings app on your phone and select “Apps & notifications.” Then, select “Camera” from the list of apps.
On the Camera settings page, tap on the “Disable” button. Another way to disable the camera is to use a third-party app. There are several different third-party apps available that can disable the camera, such as “Camera Blocker” and “Disable Camera.” For more detailed instructions, refer to this article.
1. Tools and Materials
To remove a SIM card from an Android phone, you will need the following tools and materials:
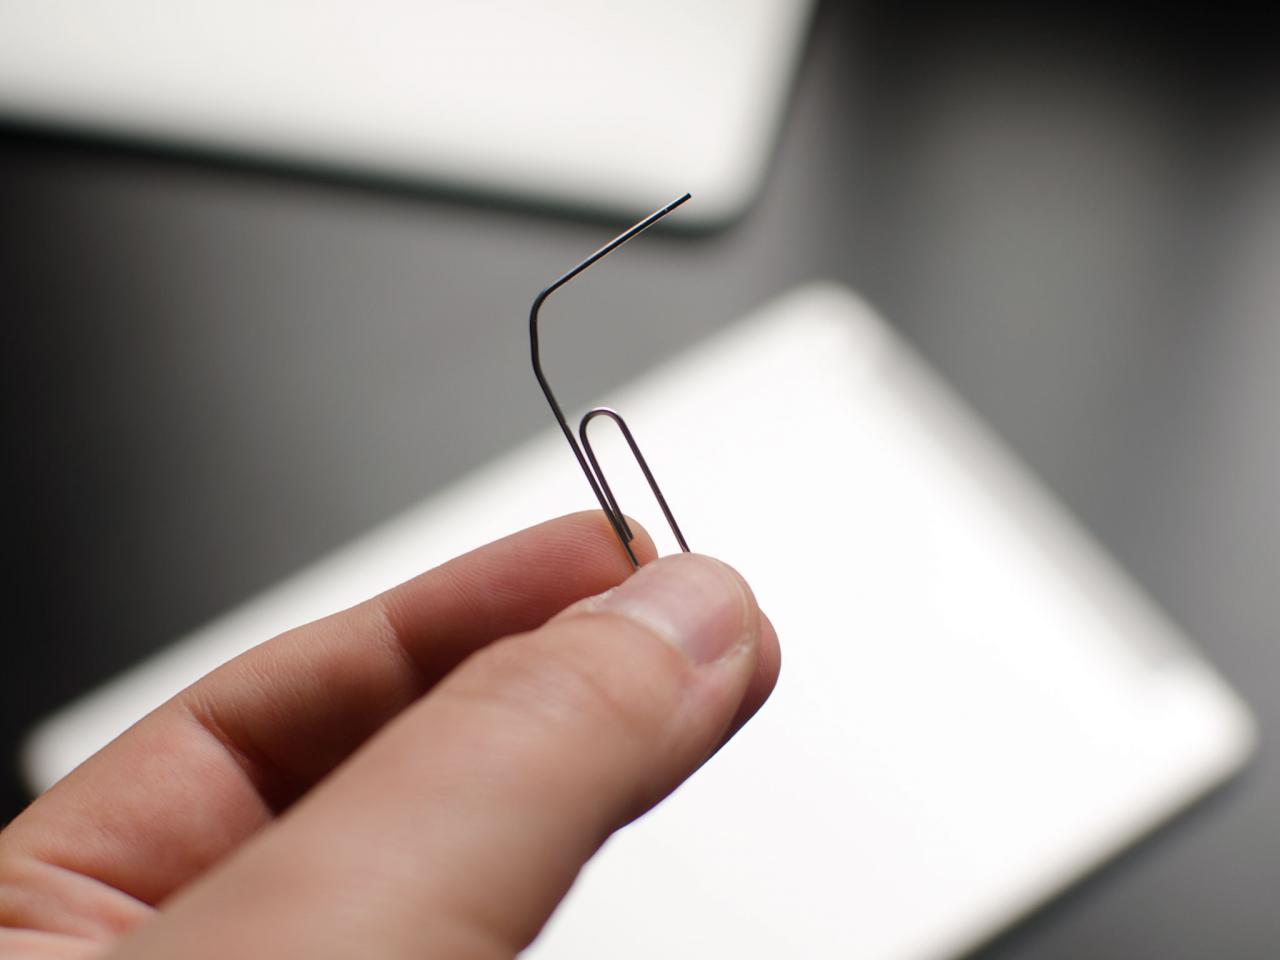
- SIM card ejector tool or a straightened paperclip
- Soft cloth or microfiber towel
SIM Card Ejector Tool
The SIM card ejector tool is a small, thin, and pointed metal tool specifically designed for removing SIM cards from Android phones. It is typically included with the phone when you purchase it. If you don’t have a SIM card ejector tool, you can use a straightened paperclip instead.
Soft Cloth or Microfiber Towel
How to Remove a SIM Card from an Android Phone, A Comprehensive Guide
The soft cloth or microfiber towel is used to clean the SIM card and the SIM card tray before reinserting them into the phone. This helps to prevent dust or debris from getting into the phone and causing problems.
If you’re on an Android device and want to connect to Fly-Fi, the in-flight Wi-Fi service offered by Southwest Airlines, there are a few steps you need to follow. First, make sure that your device’s Wi-Fi is turned on. Then, open your device’s Wi-Fi settings and select “Fly-Fi” from the list of available networks.
Once you’ve selected “Fly-Fi,” you’ll be prompted to enter a password. The password can be found on the back of your boarding pass or on the overhead screens on the plane. Once you’ve entered the password, you’ll be connected to Fly-Fi and able to browse the internet, check email, and more.
For more detailed instructions, refer to this article.
2. Safety Precautions
Before removing the SIM card from your Android phone, it is important to take the following safety precautions:
- Turn off the phone.
- Handle the phone and SIM card with care.
- Do not insert the SIM card into the phone upside down or backwards.
- Turn off the phone.
- Locate the SIM card tray on the side of the phone.
- Insert the SIM card ejector tool or straightened paperclip into the small hole next to the SIM card tray.
- Press down on the SIM card ejector tool or straightened paperclip to eject the SIM card tray.
- Remove the SIM card from the tray.
- Clean the SIM card and the SIM card tray with a soft cloth or microfiber towel.
- Insert the SIM card back into the tray.
- Insert the SIM card tray back into the phone.
- Turn on the phone.
- If you are having trouble removing the SIM card, you can take the phone to a repair shop and have them remove it for you.
- It is important to keep the SIM card and the SIM card tray clean. Dust or debris can get into the phone and cause problems.
- Do not remove the SIM card while the phone is turned on. This could cause data loss or damage to the phone.
Turning Off the Phone

How to Remove a SIM Card from an Android Phone, A Comprehensive Guide
Turning off the phone before removing the SIM card is important to prevent any data loss or damage to the phone. When the phone is turned on, the SIM card is actively being used and removing it could cause problems.
Handling the Phone and SIM Card with Care
The phone and SIM card are both delicate electronic components, so it is important to handle them with care. Do not drop or bend the phone or SIM card, and do not insert the SIM card into the phone with excessive force.
Inserting the SIM Card Correctly, How to remove sim card from android phone
The SIM card must be inserted into the phone correctly in order to work properly. Make sure that the SIM card is facing the correct way and that it is fully inserted into the SIM card tray.
3. Step-by-Step s
4. Troubleshooting
| Problem | Cause | Resolution |
|---|---|---|
| The SIM card tray won’t open. | The SIM card ejector tool or straightened paperclip is not inserted correctly. | Make sure that the SIM card ejector tool or straightened paperclip is inserted into the correct hole and that it is pressed down firmly. |
| The SIM card is not recognized by the phone. | The SIM card is not inserted correctly. | Make sure that the SIM card is facing the correct way and that it is fully inserted into the SIM card tray. |
| The phone is not working after the SIM card is removed. | The phone is not turned on. | Make sure that the phone is turned on. |
5. Additional Tips
Wrap-Up
Master the art of SIM card removal with our comprehensive guide. Whether you’re a seasoned tech enthusiast or a novice user, this detailed analysis provides the knowledge and confidence to handle your Android phone with precision.
If you’ve ever misplaced your Android phone and don’t know how to find it, there are several methods you can use. One option is to use the “Find My Device” feature on your iPhone, which allows you to track your Android phone’s location.
To do this, you’ll need to have the “Find My Device” app installed on both your iPhone and Android phone, and you’ll need to be signed in to the same Google account on both devices. Once you’ve done that, you can open the “Find My Device” app on your iPhone and select your Android phone from the list of devices.
You’ll then be able to see your phone’s location on a map, and you can even make it ring or vibrate to help you find it. For more detailed instructions, refer to this article.
FAQ Corner: How To Remove Sim Card From Android Phone
Can I damage my phone by removing the SIM card?
Mishandling the phone or SIM card during removal can cause damage. Follow the safety precautions Artikeld in the guide to minimize risks.
What should I do if my SIM card tray is stuck?
Gently insert the SIM ejector tool into the tray hole and apply slight pressure to release the tray.
Can I use a paperclip to remove the SIM card?
While possible, using a dedicated SIM ejector tool is recommended to avoid damaging the tray or SIM card.
How to play pokemon phoenix rising on android – Embark on an extraordinary adventure in Pokémon Phoenix Rising on Android, where you’ll delve into a captivating world of Pokémon battles, exploration, and customization. This comprehensive guide will equip you with the essential knowledge and strategies to conquer this thrilling game.
Furthermore, to replicate the contents of one Android phone onto another without incurring any costs, consult how to clone an android phone for free. This detailed guide provides a step-by-step approach to seamlessly transfer data between Android devices.
Gameplay Overview
Pokémon Phoenix Rising is a turn-based RPG that follows the classic Pokémon formula. Players take on the role of a young trainer who must travel the world, catch Pokémon, and battle other trainers. The game features over 800 Pokémon to catch, each with its own unique abilities and stats.
Catching Pokémon
Pokémon can be caught using Poké Balls. To catch a Pokémon, players must first weaken it in battle. Once the Pokémon is weakened, players can throw a Poké Ball at it. If the Poké Ball hits the Pokémon, it will be captured.
Training Pokémon
Pokémon can be trained by battling other Pokémon. As Pokémon level up, they will learn new moves and their stats will increase. Players can also use items to train their Pokémon.
Battling Other Trainers
Players can battle other trainers throughout the game. Battles are turn-based, and players can use their Pokémon’s attacks, abilities, and items to defeat their opponents.
Battle System
The battle system in Pokémon Phoenix Rising is turn-based. Players take turns choosing actions for their Pokémon. Actions include attacking, using abilities, or using items.
Attacks
Pokémon can use a variety of attacks to damage their opponents. Attacks can be physical, special, or status. Physical attacks deal damage based on the attacker’s Attack stat, while special attacks deal damage based on the attacker’s Special Attack stat.
Additionally, if you encounter difficulties retrieving data from an API within Android Studio using Java, refer to how to fetch data from api in android studio java. This comprehensive guide offers solutions for fetching data effectively and efficiently.
Status attacks do not deal damage, but they can affect the target’s stats or condition.
Abilities, How to play pokemon phoenix rising on android
Pokémon also have abilities that can give them an advantage in battle. Abilities can be passive, which means they are always active, or they can be activated by the player. Passive abilities can provide a variety of benefits, such as increasing the Pokémon’s stats or giving it resistance to certain types of attacks.
Activated abilities can be used to heal the Pokémon, attack the opponent, or change the Pokémon’s stats.
Items
Players can use items in battle to heal their Pokémon, boost their stats, or change the course of the battle. Items can be purchased from shops or found throughout the world.
Exploration and Quests
Pokémon Phoenix Rising features a large world to explore. Players can travel through forests, mountains, deserts, and oceans. As they explore, they will encounter wild Pokémon, trainers, and other characters.
Quests
Players can complete quests to earn rewards. Quests can be given by NPCs or found throughout the world. Quests can range from simple tasks, such as delivering a message, to more complex tasks, such as defeating a powerful Pokémon.
Lastly, if you wish to superimpose one image onto another on your Android device, refer to how to put a picture on another picture android. This tutorial provides clear instructions on combining images and creating visually appealing composites.
Hidden Items and Secrets
The world of Pokémon Phoenix Rising is filled with hidden items and secrets. Players can find hidden items by searching bushes, trees, and rocks. They can also find secrets by talking to NPCs and completing quests.
Customization and Character Development
Players can customize their character’s appearance and abilities in Pokémon Phoenix Rising. They can choose their character’s gender, hair color, eye color, and clothing. They can also choose which Pokémon they want to start with.
Android users seeking to customize their devices with unique signatures can easily do so by following the comprehensive guide provided here. For those looking to retrieve data from APIs within Android Studio Java applications, detailed instructions are available here.
Furthermore, users can effortlessly overlay one image onto another on their Android devices by utilizing the step-by-step instructions found here.
Leveling Up
As players progress through the game, their character will level up. Leveling up increases the character’s stats and allows them to learn new abilities.
Building a Strong Team
To succeed in Pokémon Phoenix Rising, players need to build a strong team of Pokémon. Players can do this by catching Pokémon with good stats and abilities. They can also train their Pokémon to increase their stats and learn new moves.
Social Features
Pokémon Phoenix Rising features a variety of social features that allow players to interact with each other. Players can trade Pokémon with each other, join guilds, and chat with each other.
To customize your Android experience further, consider adding a signature to your phone for a personalized touch. How to add signature on android phone provides step-by-step instructions on creating and incorporating a unique signature into your device.
Trading Pokémon
Players can trade Pokémon with each other using the GTS. The GTS is a global trading system that allows players to search for specific Pokémon to trade. Players can also trade Pokémon with each other directly.
Guilds
Players can join guilds to team up with other players and work together to achieve common goals. Guilds can compete against each other in tournaments and other events.
Chat
Players can chat with each other using the in-game chat system. The chat system allows players to communicate with each other in real time.
Concluding Remarks
Master the mechanics, conquer epic battles, explore hidden realms, and forge a formidable team in Pokémon Phoenix Rising. Embrace the captivating social features, connect with fellow trainers, and immerse yourself in an unforgettable Pokémon experience on your Android device.
FAQ Overview: How To Play Pokemon Phoenix Rising On Android
How do I start playing Pokémon Phoenix Rising on Android?
Download the game from the Google Play Store and create an account to begin your adventure.
What are the different types of Pokémon in the game?
There are over 800 Pokémon species, each with unique abilities and types, including Fire, Water, Grass, Electric, and more.
How do I level up my Pokémon?
Engage in battles, complete quests, and use experience candies to enhance your Pokémon’s stats and abilities.
Can I trade Pokémon with other players?
Yes, you can connect with friends or join a guild to trade Pokémon and collaborate on challenges.
How do I find hidden items and secrets in the game?
Explore every nook and cranny of the game world, interact with NPCs, and solve puzzles to uncover hidden treasures and secrets.

How to play ios games on android – Immerse yourself in the world of iOS gaming on your Android device with our comprehensive guide to playing iOS games on Android. Discover the possibilities, navigate compatibility considerations, optimize performance, explore controller options, and navigate legal and ethical implications.
Another common annoyance for Android users is the presence of advertisements on YouTube. However, there are effective methods to remove these intrusive interruptions. The detailed tutorial how to remove ads from youtube on android provides step-by-step instructions on how to block ads and enjoy an uninterrupted viewing experience.
Embark on a detailed analytical journey as we delve into the technicalities and nuances of this captivating topic, uncovering insights and solutions to enhance your gaming experience.
Emulator Options
There are several iOS emulators available for Android, each with its own pros and cons. The most popular options include:
- Cidera: An open-source emulator known for its compatibility and performance.
- iEMU: A user-friendly emulator with a simple interface and good game support.
- NDS4Droid: An emulator specifically designed for playing Nintendo DS games, which can also run some iOS games.
- Provenance: A multi-platform emulator that supports a wide range of gaming systems, including iOS.
When choosing an emulator, consider factors such as compatibility, performance, and ease of use. Some emulators may be better suited for certain iOS games or devices.
Installing and Setting Up an iOS Emulator
- Download the emulator APK file from a trusted source.
- Enable “Unknown Sources” in your Android device’s security settings.
- Install the emulator APK file.
- Launch the emulator and follow the on-screen instructions to configure it.
- Download the iOS game ROM or IPA file and load it into the emulator.
Compatibility Considerations
Not all iOS games are compatible with Android emulators. Factors that affect compatibility include:
- iOS Version: Some emulators only support specific versions of iOS.
- Hardware Requirements: The game may require hardware features that are not available on Android devices.
- Game Engine: Some emulators may not be able to emulate certain game engines used in iOS games.
Troubleshooting Compatibility Issues, How to play ios games on android
- Check if your emulator supports the iOS version of the game.
- Ensure that your Android device meets the hardware requirements of the game.
- Try different emulators to see if one is more compatible with the game.
Performance Optimization
Running iOS games on Android emulators can be demanding on your device’s resources. Here are some tips to optimize performance:
- Reduce Emulator Settings: Adjust emulator settings such as resolution and graphics quality to improve performance.
- Close Background Apps: Close any unnecessary apps running in the background to free up memory.
- Enable Performance Mode: Some emulators offer a “performance mode” that prioritizes speed over graphics.
- Manage Battery Life: Use battery-saving features in the emulator and on your device to extend playtime.
Controller Support
You can use various controllers to play iOS games on Android emulators, including:
- Physical Controllers: Connect physical controllers via Bluetooth or USB.
- Virtual Controllers: Use on-screen virtual buttons or joysticks within the emulator.
- Touch Controls: Use the touchscreen to control the game directly.
Connecting and Configuring Controllers
- Enable Bluetooth or USB on your Android device.
- Pair your physical controller with your device.
- Configure the controller buttons within the emulator settings.
Legal and Ethical Considerations
How to Play iOS Games on Android, A Comprehensive Guide
Playing iOS games on Android emulators raises some legal and ethical concerns:
Legal Implications
- Copyright Infringement: Emulating iOS games may violate copyright laws if you do not own the original game.
- Terms of Service Violation: Using emulators may violate the terms of service of the App Store.
Ethical Concerns
- Supporting Piracy: Emulation can facilitate piracy by allowing users to play games they have not purchased.
- Undermining Developers: Emulation can reduce revenue for game developers, potentially harming the industry.
Responsible Emulation Practices
- Only emulate games that you own legally.
- Respect the intellectual property rights of developers.
- Use emulation for educational or preservation purposes.
Final Summary
Master the art of playing iOS games on Android with our expert guidance. Embrace the possibilities, optimize your experience, and enjoy a seamless gaming experience that transcends platform boundaries. Let this guide be your beacon as you conquer the challenges and unlock the full potential of iOS gaming on your Android device.
Query Resolution: How To Play Ios Games On Android
Can all iOS games be played on Android?
Android devices offer a myriad of customization options, allowing users to tailor their devices to their preferences. Among these options is the ability to change the color of text message bubbles. By following the steps outlined in this comprehensive guide how to change text message bubble color on android , users can effortlessly personalize their messaging experience.
Not all iOS games are compatible with Android emulators due to differences in operating systems and hardware requirements.
Is it legal to play iOS games on Android using emulators?
Forwarding text messages to email can be a valuable tool for organizing and archiving important conversations. The comprehensive tutorial how to forward a text message to email on android provides detailed instructions on how to set up automatic forwarding and manually forward individual messages, enabling users to preserve and access their text message history effortlessly.
The legality of playing iOS games on Android using emulators varies depending on the specific game and emulator used. It’s important to consider copyright laws and licensing agreements.
Customizing the Google Chrome homepage on Android devices can enhance the user experience by providing quick access to frequently visited websites. The guide how to add website shortcut to google chrome homepage android offers clear instructions on how to add website shortcuts to the homepage, ensuring efficient and convenient web browsing.
What are the best emulators for playing iOS games on Android?
Some popular iOS emulators for Android include iEMU, Cider, and Appetize.io. The best emulator for you will depend on your specific needs and preferences.
Can I use a physical controller to play iOS games on Android?
Yes, you can use physical controllers with iOS emulators on Android. Some emulators support Bluetooth or USB controllers, allowing you to enjoy a console-like gaming experience.
How to play games made for older Android devices is a question that has plagued gamers for years. With the constant release of new games and devices, it can be difficult to keep up with the latest and greatest. However, there are still many great games that can be played on older Android devices.
In the realm of Android devices, navigating the intricacies of device management can be a daunting task. However, with a few simple steps, you can master the art of managing your Android’s SMS messaging, open tabs, and storage space. To disable SMS messaging, refer to this comprehensive guide for step-by-step instructions.
Additionally, if you find yourself overwhelmed by a multitude of open tabs on your Android, this resource will provide valuable tips on closing them efficiently.
In this guide, we will show you how to find, optimize, and play games made for older Android devices.
Playing games made for older Android devices can be a great way to relive your childhood or simply enjoy some classic titles. With a little bit of effort, you can get your older Android device up and running with your favorite games in no time.
Furthermore, managing storage space on your Android device is crucial for optimal performance. If you’re facing the enigmatic “Other” category that seems to consume a significant portion of your storage, this guide offers practical solutions to clear it and reclaim precious storage space.
Lastly, for those seeking to enjoy the convenience of screen mirroring their Android devices to their Vizio TVs, this tutorial provides a detailed roadmap to achieve seamless screen mirroring.
How to Play Games Made for Older Android
The proliferation of smartphones and tablets has made gaming more accessible than ever before. However, older Android devices may struggle to run modern games designed for newer hardware. This article provides a comprehensive guide to playing games on older Android devices, covering compatibility considerations, game selection and optimization, emulator options, troubleshooting and performance enhancements, and community resources and support.
Compatibility Considerations
Before attempting to play games on an older Android device, it is essential to understand the system requirements and compatibility factors. Older devices may have limited processing power, graphics capabilities, and memory, which can impact the performance of games designed for newer devices.
Consider the following factors:
- Operating System Version:Ensure that the device is running a compatible version of Android. Some games may require a specific minimum version to function properly.
- Processor Speed:The speed of the device’s processor determines how quickly it can execute instructions. Games with complex graphics and physics simulations may require a faster processor.
- RAM:RAM (Random Access Memory) stores temporary data and instructions while the device is running. Games that load large amounts of data or require multitasking may require more RAM.
- Graphics Card:The graphics card handles the rendering of images and videos. Games with high-quality graphics may require a more powerful graphics card.
- Storage Space:Games can occupy significant storage space, so it is important to ensure that the device has enough free space to install and run the game.
Game Selection and Optimization
When selecting games for an older Android device, it is important to consider the device’s capabilities and limitations. Some genres and titles are more well-suited for older hardware than others. Consider the following:
- 2D Games:2D games typically require less processing power and graphics capabilities than 3D games, making them more suitable for older devices.
- Retro Games:Retro games, such as those from the 8-bit and 16-bit eras, are often optimized for older hardware and can run smoothly on older Android devices.
- Casual Games:Casual games, such as puzzle games, card games, and board games, typically have lower system requirements and can be played on older devices.
- Game Settings:Many games allow players to adjust the graphics quality and other settings to improve performance on older devices. Lowering the resolution, reducing the detail level, and disabling special effects can help improve gameplay.
Emulator Options, How to play games made for older android
Emulators are software that allows users to run games from older consoles and platforms on newer devices. Emulators can be a good option for playing older games that are not available on Android or that require specific hardware configurations. Consider the following:
- Advantages:Emulators allow users to play a wide range of older games on newer devices, including games that are no longer available or that were designed for specific platforms.
- Disadvantages:Emulators can be complex to set up and configure, and they may not be able to perfectly replicate the performance of the original hardware.
- Compatibility:Not all emulators are compatible with all games, so it is important to research which emulator is best suited for the game you want to play.
Troubleshooting and Performance Enhancements
If you encounter issues while playing games on an older Android device, there are several troubleshooting steps you can take:
- Clear Cache:Clearing the game’s cache can help resolve issues caused by corrupted or outdated files.
- Manage Storage:Ensure that the device has enough free storage space to run the game smoothly.
- Optimize Memory Usage:Close any unnecessary apps or services running in the background to free up memory for the game.
- Improve Battery Life:Lowering the screen brightness, disabling vibration, and closing background apps can help extend battery life during gameplay.
- Reduce Lag:Disabling unnecessary notifications, reducing the number of apps installed, and optimizing game settings can help reduce lag during gameplay.
Community Resources and Support
There are several online forums, communities, and resources dedicated to gaming on older Android devices. These resources can provide valuable support, game recommendations, and troubleshooting assistance:
- XDA Developers:XDA Developers is a popular forum where users can discuss Android devices, development, and gaming.
- RetroArch:RetroArch is an open-source emulator that supports a wide range of older consoles and platforms.
- Old Games on Android:Old Games on Android is a website that provides a curated list of retro games that are compatible with Android devices.
Epilogue
Playing games made for older Android devices can be a great way to save money, relive your childhood, or simply enjoy some classic titles. With a little bit of effort, you can get your older Android device up and running with your favorite games in no time.
When you want to temporarily disable the ability to send or receive text messages on your Android device, you can turn off SMS messaging. Similarly, if you have multiple tabs open in your Android browser and want to close them all at once, you can close open tabs with a few simple steps.
Additionally, if you notice the “Other” category taking up a significant amount of storage space on your Android device, you can clear other to free up some space. Lastly, if you want to share your Android screen with a larger display, you can screen mirror it to a Vizio TV.
So what are you waiting for? Start playing today!
Clarifying Questions
Can I play any game on my older Android device?
No, not all games are compatible with older Android devices. However, there are many games that are still playable on older devices. You can find a list of compatible games on the Google Play Store.
How can I optimize my older Android device for gaming?
There are a few things you can do to optimize your older Android device for gaming. First, make sure that you have the latest version of the Android operating system installed. You can also try closing any unnecessary apps and processes that may be running in the background.
Additionally, you can try adjusting the game’s graphics settings to improve performance.
What are some good games to play on my older Android device?
There are many great games that can be played on older Android devices. Some popular titles include Angry Birds, Candy Crush Saga, and Temple Run. You can also find a list of compatible games on the Google Play Store.
Play Pokémon Phoenix Rising on Android, An In-Depth Guide

How to Play iOS Games on Android, A Comprehensive Guide
How to Play Games Made for Older Android Devices, A Guide for Retro Gaming
Unlocking Your Android Phone, A Comprehensive Guide to Checking Status and Navigating Pros and Cons
Hoyoplay Download, A Comprehensive Guide to Downloading Games
Unveiling Your Digital Footprint, A Comprehensive Guide to Viewing History on Android
-
Gadget6 months ago
Unlocking Your Android Phone, A Comprehensive Guide to Checking Status and Navigating Pros and Cons
-
Games6 months ago
Hoyoplay Download, A Comprehensive Guide to Downloading Games
-
Gadget5 months ago
Unveiling Your Digital Footprint, A Comprehensive Guide to Viewing History on Android
-
Games6 months ago
Elden Ring Walkthrough, A Comprehensive Guide to Conquer the Lands Between
-
Gadget6 months ago
Remove Meta AI from WhatsApp Android, A Comprehensive Guide
-
Gadget6 months ago
How to Play Pokémon Infinite Fusion on Android, A Comprehensive Guide to Endless Fusion and Evolution
-
Gadget6 months ago
How to Know If an Android Blocked You on iPhone, Unraveling the Signs
-

 Games6 months ago
Caria Manor, A Guide to the Royal Ruins