
Gadget
Activate TextNow SIM Card on Android, A Comprehensive Guide
How to activate textnow sim card android – Discover the effortless way to activate your TextNow SIM card on Android devices with our comprehensive guide. Dive into the seamless activation process, troubleshoot common issues, and explore advanced options to tailor your TextNow experience.
Cropping photos on your Android device is a simple yet effective way to enhance their composition. By following the instructions in how to crop a photo in android , you can easily remove unwanted elements, adjust the aspect ratio, and improve the overall aesthetics of your images.
Follow our detailed step-by-step instructions to activate your SIM card, resolve any hiccups along the way, and unleash the full potential of TextNow’s communication services.
In case of an emergency, your Android device has a built-in emergency call feature. However, if you need to disable this feature temporarily, you can do so by following the instructions in how to disable emergency call in android.
This guide provides detailed steps on how to access the necessary settings and make the necessary changes.
How to Activate TextNow SIM Card on Android Devices: How To Activate Textnow Sim Card Android
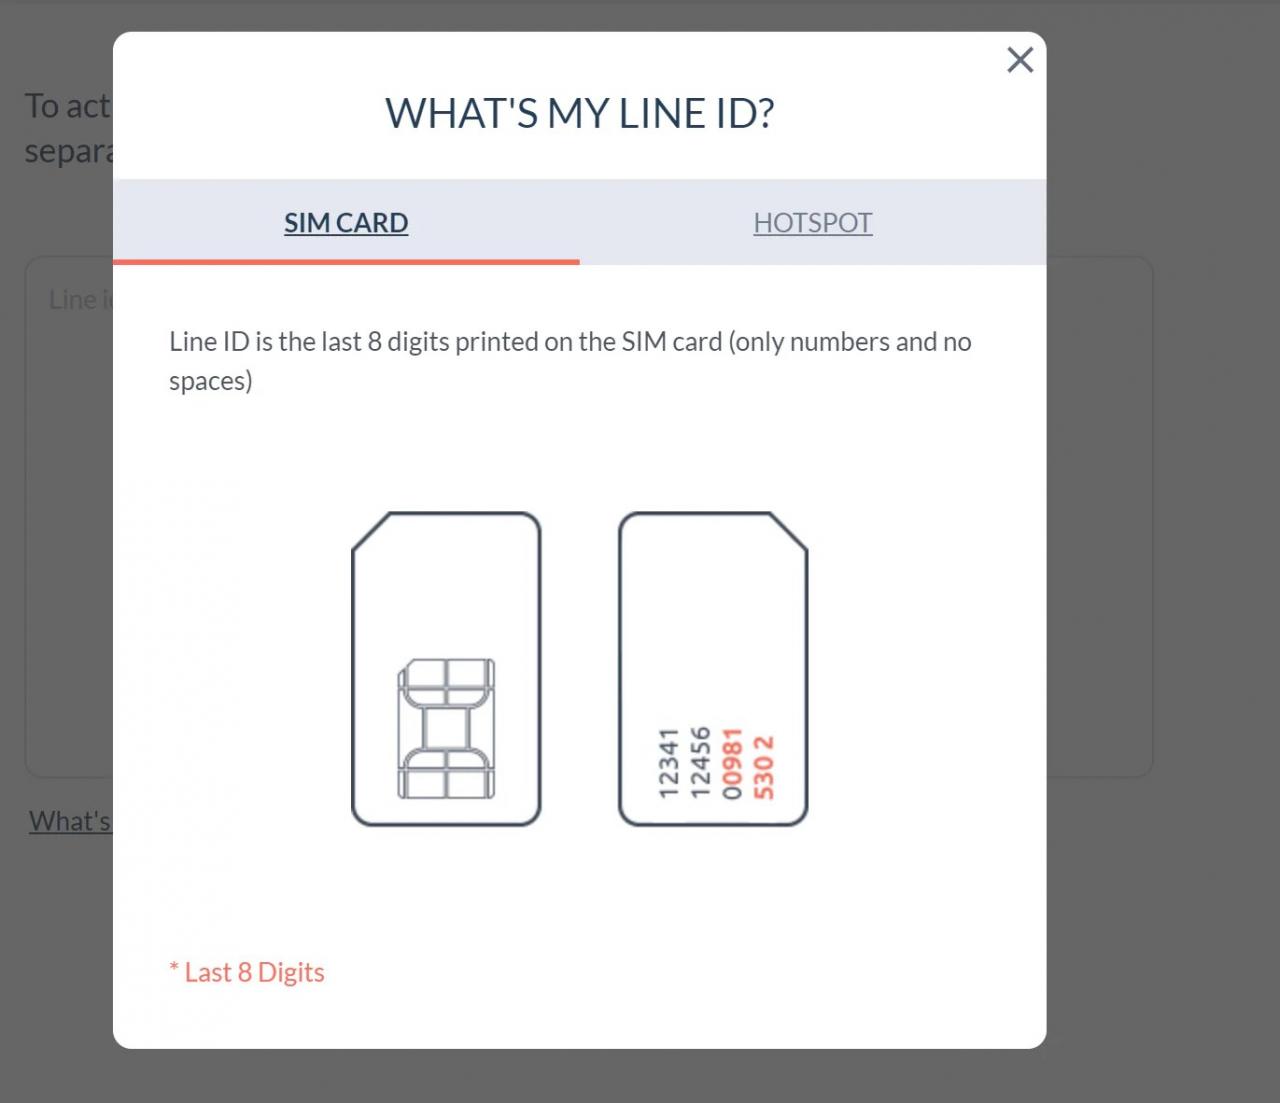
TextNow is a popular app that allows users to make free calls, send text messages, and use data without a traditional cellular plan. To use TextNow’s services, you’ll need to activate a TextNow SIM card. This guide will provide detailed instructions on how to activate your TextNow SIM card on an Android device.
Navigating through multiple open tabs on your Android device can be overwhelming. Fortunately, there’s an easy way to close them all at once. By following the steps outlined in how to close open tabs on android , you can quickly clear your browsing history and streamline your browsing experience.
Overview of TextNow SIM Card Activation on Android Devices, How to activate textnow sim card android
Activating a TextNow SIM card on an Android device is a straightforward process that typically takes a few minutes. Here’s a brief overview of the steps involved:
- Install the TextNow app from the Google Play Store.
- Insert the TextNow SIM card into your Android device.
- Open the TextNow app and sign in or create an account.
- Activate the SIM card using the provided activation code.
Step-by-Step Activation Instructions
| Step | Action | Image/Screenshot | Description |
|---|---|---|---|
| 1 | Install the TextNow App | [Image of Google Play Store with TextNow app page] | Visit the Google Play Store and search for “TextNow.” Tap on the “Install” button to download and install the app. |
| 2 | Insert the SIM Card | [Image of inserting SIM card into Android device] | Turn off your Android device and insert the TextNow SIM card into the designated SIM card slot. |
| 3 | Open the TextNow App and Sign In | [Image of TextNow app login screen] | Open the TextNow app and sign in using your existing account or create a new one by tapping on the “Sign Up” button. |
| 4 | Activate the SIM Card | [Image of TextNow app activation screen] | Enter the activation code provided with your TextNow SIM card. Tap on the “Activate” button to complete the activation process. |
Troubleshooting Common Activation Issues
If you encounter any issues while activating your TextNow SIM card, here are some common problems and their solutions:
- SIM card not recognized:Ensure that the SIM card is properly inserted into the SIM card slot.
- Activation code not working:Double-check that you have entered the activation code correctly. If the code is still not working, contact TextNow customer support.
- Unable to sign in to the TextNow app:Verify that you are using the correct login credentials. If you have forgotten your password, you can reset it through the TextNow app.
Advanced Activation Options
In addition to the standard activation process, TextNow also offers advanced activation options for specific scenarios:
- Activating a TextNow SIM card on a non-Android device:Contact TextNow customer support for assistance with activating your SIM card on a non-Android device.
- Activating a TextNow SIM card with a custom phone number:You can purchase a custom phone number from TextNow and activate it with your SIM card.
- Porting an existing phone number to TextNow:TextNow allows you to port your existing phone number from another carrier to your TextNow SIM card.
Final Wrap-Up
Activate TextNow SIM Card on Android, A Comprehensive Guide
With this guide as your beacon, activating your TextNow SIM card on Android becomes a breeze. Embrace the world of free calls, texts, and data, and stay connected without breaking the bank. Whether you’re a seasoned TextNow user or a curious newcomer, this guide empowers you to unlock the full potential of your TextNow SIM card and enhance your mobile communication experience.
Expert Answers
Can I activate my TextNow SIM card on a non-Android device?
If you’ve forgotten your SIM PIN code, don’t panic. You can easily retrieve it by following the steps outlined in how to find sim pin code android. This guide covers various methods for recovering your PIN code, including using the default code, contacting your network provider, or resetting your device.
Yes, you can activate your TextNow SIM card on non-Android devices using the TextNow website or by contacting customer support.
What should I do if my activation code is not working?
Check if the code is entered correctly, ensure your internet connection is stable, and try restarting the TextNow app or your device.
How can I activate my TextNow SIM card with a custom phone number?
Custom phone numbers can be purchased through the TextNow app or website for an additional fee.


How to pair probuds to android – Discover the seamless process of pairing Probuds to your Android device. This comprehensive guide will navigate you through every step, ensuring a flawless connection for an immersive audio experience.
Unveiling the intricacies of compatibility and requirements, we delve into the Bluetooth versions, operating system versions, and other factors that impact pairing success. Prepare your devices for a harmonious union.
Pairing Process for Android Devices
Pairing Bluetooth earbuds to an Android device is a straightforward process that typically involves a few simple steps. To ensure a successful pairing, follow these comprehensive instructions:
- Enable Bluetooth on your Android device by navigating to the Settings menu and selecting “Bluetooth”.
- Power on your Bluetooth earbuds and make them discoverable by following the manufacturer’s instructions. This usually involves holding down a button on the earbuds or placing them in a charging case.
- On your Android device, go back to the Bluetooth settings menu and select “Scan for devices”.
- Once your earbuds appear in the list of available devices, tap on their name to initiate the pairing process.
- If prompted, enter the pairing code provided by the earbuds manufacturer. The default pairing code is usually “0000”.
- Once the pairing is complete, your earbuds will be connected to your Android device and you can start listening to music or making calls.
If you encounter any issues during the pairing process, refer to the troubleshooting tips provided in the following section.
Transforming videos into GIFs on your Android device adds a touch of fun and creativity to your communication. Unleash your imagination with the how to make a gif on android from video guide, which provides a step-by-step approach to creating visually engaging GIFs.
Compatibility and Requirements: How To Pair Probuds To Android
To ensure successful pairing, it is important to consider the compatibility between your Android device and the Bluetooth earbuds you intend to pair. Here are some key factors to keep in mind:
- Bluetooth version:Most modern Android devices support Bluetooth 5.0 or later. Check the specifications of your earbuds to ensure that they are compatible with the Bluetooth version supported by your device.
- Operating system version:Android devices running Android 6.0 or later should be able to pair with most Bluetooth earbuds. However, some older Android versions may have limited compatibility.
- Earbud model:Not all Bluetooth earbuds are created equal. Some earbuds are specifically designed to work with certain Android devices or brands. Check the manufacturer’s website or product documentation to confirm compatibility.
Advanced Features and Troubleshooting
In addition to the basic pairing process, some Bluetooth earbuds offer advanced features that can enhance the user experience. Here are a few examples:
- Multi-point connections:Some earbuds allow you to connect to multiple devices simultaneously. This feature is useful if you want to listen to music on your phone while also taking calls on your laptop.
- Voice assistant integration:Some earbuds allow you to access your phone’s voice assistant (such as Google Assistant or Siri) directly from the earbuds.
- Customizable EQ settings:Some earbuds allow you to adjust the sound profile to your liking using a dedicated app.
If you encounter any issues with your Bluetooth earbuds, here are some troubleshooting tips:
- Check if the earbuds are powered on and in pairing mode:Make sure that the earbuds are turned on and that they are in pairing mode. Refer to the manufacturer’s instructions for specific instructions on how to put the earbuds in pairing mode.
- Ensure that the earbuds are within range:Bluetooth has a limited range, so make sure that the earbuds are within range of your Android device.
- Restart your Android device and the earbuds:Sometimes, a simple restart can resolve pairing issues. Restart your Android device and the earbuds, then try pairing them again.
- Forget the earbuds from your Android device:If you have previously paired the earbuds with your Android device but are now having trouble reconnecting, try forgetting the earbuds from your device’s Bluetooth settings. Then, try pairing the earbuds again.
Comparison of Pairing Methods
There are several different methods you can use to pair Bluetooth earbuds to an Android device. Here is a comparison of the most common methods:
| Method | Advantages | Disadvantages |
|---|---|---|
| NFC pairing | – Fast and easy
|
– Requires both devices to have NFC support |
| Bluetooth scanning | – Works with all Bluetooth devices
|
– Can be slow and tedious |
| QR code pairing | – Fast and easy
|
– Requires both devices to have a QR code scanner |
The best pairing method for you will depend on the specific devices you are using and your preferences.
Furthermore, retrieving saved Wi-Fi passwords on your Android device can be a lifesaver when you need to connect to a network without having to remember the password. Explore the detailed instructions how to get saved wifi password from android to seamlessly access this information.
Closing Notes
Master the art of pairing Probuds to your Android device with our expert guidance. From initial setup to troubleshooting, we empower you to enjoy uninterrupted audio bliss. Embrace the simplicity of seamless connectivity and elevate your listening experience.
Essential FAQs
Can I pair Probuds to multiple Android devices simultaneously?
Privacy is paramount, and Android allows you to conceal specific text messages from prying eyes. Discover the effective techniques how to hide certain text messages on android to protect your sensitive conversations.
Yes, some Probuds models support multi-point connections, allowing you to connect to two devices at once.
What should I do if my Probuds are not detected by my Android device?
Ensure that Bluetooth is enabled on your device, the Probuds are powered on and in pairing mode, and there are no physical obstructions between the devices.
Unlocking the capabilities of your Android device can unveil hidden functionalities. For instance, you can easily unsend messages that you may have regretted sending. Refer to this comprehensive guide how to unsend messages on android to learn the step-by-step process.
How do I troubleshoot pairing interruptions?
Check for software updates on your Probuds and Android device, move closer to the source device, and eliminate potential interference from other wireless devices.
Gadget
Mastering Multiple Tabs, A Comprehensive Guide to Opening, Customizing, and Managing Tabs on Android
How to open multiple tabs on android – Embark on a journey to unlock the power of multiple tabs on Android devices. With a myriad of browsers at your disposal, we’ll delve into the intricacies of opening, customizing, and managing tabs seamlessly, empowering you to navigate the digital landscape with efficiency and ease.
Prepare to discover the nuances of tab settings, master the art of organizing and grouping tabs, and troubleshoot common tab-related hiccups. Our detailed analytical writing style will guide you through every step, ensuring a comprehensive understanding of this essential aspect of mobile browsing.
When looking to enhance your gaming experience on Android, understanding how to mod games on Android can provide endless possibilities. By learning the methods for modifying game files, you can unlock new features, customize gameplay, and create a truly personalized gaming environment.
Opening Multiple Tabs in Android Browsers
Accessing multiple websites simultaneously is a crucial feature in modern web browsing. Android browsers offer various methods to open multiple tabs, allowing users to navigate and access different web pages efficiently. Here are the different approaches for opening multiple tabs in popular Android browsers:
Chrome
- Long-press the URL bar:Tap and hold the address bar at the top of the browser. Select “New tab” from the menu that appears.
- Tap the “Tabs” icon:Locate the square icon with a number in the bottom right corner. Tap on it to view all open tabs and create a new one by pressing the “+” button.
- Use keyboard shortcuts:For devices with a physical or virtual keyboard, press “Ctrl” + “T” (or “Command” + “T” on Mac) to open a new tab.
Firefox
- Long-press the URL bar:Similar to Chrome, tap and hold the address bar. Select “New Tab” from the context menu.
- Tap the “Tabs” icon:Locate the grid icon with a number in the bottom right corner. Tap on it to access the tab view and create a new tab.
- Use keyboard shortcuts:Press “Ctrl” + “T” (or “Command” + “T” on Mac) to open a new tab.
Samsung Internet
- Long-press the URL bar:Tap and hold the address bar. Select “New Tab” from the pop-up menu.
- Tap the “Tabs” icon:Locate the three vertical dots icon in the bottom right corner. Select “New Tab” from the menu.
- Use keyboard shortcuts:Press “Ctrl” + “T” (or “Command” + “T” on Mac) to open a new tab.
Customizing Tab Settings
Android browsers provide various customization options for tabs, allowing users to tailor their browsing experience to their preferences. Here are the key settings that can be adjusted:
Tab Size
Users can adjust the size of tabs to suit their needs. Larger tabs provide more space for previewing content, while smaller tabs conserve screen real estate.
Switching from an iPhone to an Android device doesn’t have to mean losing your precious notes. Discover how to transfer notes from iPhone to Android and seamlessly migrate your digital memos. Whether you use iCloud, third-party apps, or Google’s own services, there are multiple methods to ensure your notes make the transition without any hassle.
Tab Previews
Tab previews display a snapshot of the web page when hovering over a tab. This feature can be enabled or disabled based on user preference.
Tab Grouping
Tab grouping allows users to organize tabs into different groups. This helps in managing multiple tabs effectively and quickly switching between related web pages.
Managing your Android device’s storage can be a breeze with the right knowledge. If you’re looking to clear up space, learning how to delete PDF files from Android can help you efficiently remove unwanted documents. With a few simple steps, you can reclaim valuable storage space and keep your device running smoothly.
Managing Multiple Tabs
Effectively managing multiple tabs is essential for a seamless browsing experience. Here are some techniques to organize and manage tabs:
Organizing Tabs
Users can drag and drop tabs to reorder them or group them together. This helps in keeping frequently visited tabs close at hand.
Using Tab Groups
Tab groups provide a structured way to organize tabs into different categories. Users can create new groups, rename them, and move tabs between groups.
Closing Unnecessary Tabs
Regularly closing unnecessary tabs helps in freeing up memory and reducing browser clutter. Users can close individual tabs by tapping the “X” button on the tab or use the “Close All Tabs” option to close all open tabs.
Expressing your creativity on your Android device goes beyond just taking photos. By exploring how to draw on a picture Android , you can transform your images into works of art. With the right apps and techniques, you can add sketches, doodles, and annotations to your photos, giving them a unique and personal touch.
Troubleshooting Tab-Related Issues
Occasionally, users may encounter issues related to tabs in Android browsers. Here are some common problems and their solutions:
Tabs Crashing or Freezing, How to open multiple tabs on android
This can be caused by excessive memory usage or corrupted tabs. Try closing unnecessary tabs, restarting the browser, or clearing the browser cache.
Tabs Not Opening or Loading
Check your internet connection and ensure that the website is accessible. Try refreshing the tab or restarting the browser.
Tabs Disappearing or Closing Unexpectedly
This can be caused by a browser bug or a third-party app interfering with the browser. Update the browser to the latest version or try disabling recently installed apps.
Ending Remarks: How To Open Multiple Tabs On Android
In this comprehensive guide, we’ve explored the intricacies of opening, customizing, and managing multiple tabs on Android browsers. By harnessing the techniques Artikeld, you’ll transform your browsing experience, unlocking a new level of productivity and efficiency. Remember, mastering multiple tabs is not merely a technical skill; it’s an art form that empowers you to navigate the vast digital ocean with grace and precision.
FAQ Resource
Can I open multiple tabs simultaneously in different Android browsers?
Yes, most Android browsers, including Chrome, Firefox, and Samsung Internet, allow you to open and manage multiple tabs concurrently.
How do I adjust the size of tabs in my Android browser?
Tab size customization options vary depending on the browser. In Chrome, you can long-press on the tab bar and select “Customize tabs” to adjust the size.
Can I group tabs together for better organization?
Yes, tab grouping is available in many Android browsers. In Chrome, right-click on a tab and select “Add to group” to create and manage tab groups.
How to mute a youtube video on android – Muting YouTube videos on Android offers numerous benefits, including creating a more peaceful environment, conserving data, and avoiding distractions. This guide delves into the various methods and customization options available for effectively muting videos on your Android device.
If you’re using split-screen mode on your Android device and want to remove it, how to remove split screen on android offers a detailed guide. It explains how to exit split-screen mode using gestures or navigation buttons.
Introduction to Muting YouTube Videos on Android
Muting YouTube videos on Android offers several advantages. It allows users to enjoy videos without disturbing others, create a more focused listening experience, or conserve battery life. Additionally, muting is useful in situations where audio playback is not appropriate, such as in public spaces, libraries, or during meetings.
Methods to Mute YouTube Videos on Android
Using the YouTube App
1. Open the YouTube app and select the video you want to mute.
2. Tap the volume icon in the bottom-right corner of the screen.
3. Drag the volume slider all the way down to mute the video.
Sharing pictures from your Android device to an iPhone can be done seamlessly. How to share pics from android to iphone offers a step-by-step guide on using Bluetooth, email, or cloud services to transfer your photos effortlessly between different operating systems.
Using External Apps or Browser Extensions, How to mute a youtube video on android
There are several external apps and browser extensions available that allow you to mute YouTube videos. These tools typically provide additional features, such as automatic muting, customizable keyboard shortcuts, and the ability to mute multiple tabs at once.
If you find your Android device’s screen timing out too quickly, you can easily disable this feature. How to disable screen timeout on android provides step-by-step instructions on how to adjust your screen timeout settings or disable it altogether.
Pros and Cons of Each Method
- YouTube App:Easy to use, built-in feature, no additional software required.
- External Apps/Browser Extensions:More customization options, can be used to mute videos on other websites.
Customization Options for Muting
YouTube offers various customization options for muting videos:
Permanent Muting
To permanently mute a video, tap the “Mute” button located below the video player. This will mute the video until you unmute it manually.
Temporary Muting
To temporarily mute a video, tap the volume icon in the bottom-right corner of the screen. The video will remain muted until you tap the volume icon again.
Mute Only When Using Headphones or Bluetooth Devices
To mute videos only when using headphones or Bluetooth devices, go to the YouTube settings and select “Playback.” Under the “Headphones” section, enable the “Mute audio when headphones or external speakers are connected” option.
Managing your call history on Android is easy. If you need to delete specific calls or clear your entire history, how to delete call history on android provides comprehensive instructions. It covers various methods for deleting call logs, ensuring your privacy and managing your phone’s storage.
Troubleshooting Common Issues: How To Mute A Youtube Video On Android
Video Not Muting
- Clear the YouTube app cache and data.
- Update the YouTube app to the latest version.
- Check the device settings to ensure that the sound is not muted.
Video Mutes Automatically
- Check if the “Mute audio when headphones or external speakers are connected” option is enabled in the YouTube settings.
- Disable any external apps or browser extensions that may be causing the automatic muting.
Conclusive Thoughts
Understanding how to mute YouTube videos on Android empowers users to customize their viewing experience, enhance their productivity, and enjoy videos in any setting without disturbing others. Whether you’re in a quiet library, a crowded commute, or simply seeking a moment of tranquility, this guide provides the knowledge and techniques to mute videos with ease.
Q&A
Can I mute YouTube videos permanently?
Yes, you can mute videos permanently by adjusting the volume settings within the YouTube app.
How do I mute videos only when using headphones?
Go to the YouTube app settings and enable the “Mute when headphones connected” option.
What should I do if I can’t mute YouTube videos?
Try clearing the YouTube app cache, updating the app, or checking your device’s audio settings.
-
Gadget6 months ago
Unlocking Your Android Phone, A Comprehensive Guide to Checking Status and Navigating Pros and Cons
-
Games6 months ago
Hoyoplay Download, A Comprehensive Guide to Downloading Games
-
Gadget5 months ago
Unveiling Your Digital Footprint, A Comprehensive Guide to Viewing History on Android
-
Games6 months ago
Elden Ring Walkthrough, A Comprehensive Guide to Conquer the Lands Between
-
Gadget6 months ago
Remove Meta AI from WhatsApp Android, A Comprehensive Guide
-
Gadget6 months ago
How to Play Pokémon Infinite Fusion on Android, A Comprehensive Guide to Endless Fusion and Evolution
-
Gadget6 months ago
How to Know If an Android Blocked You on iPhone, Unraveling the Signs
-
Gadget6 months ago
How to Run EXE Files on Android, A Comprehensive Guide