
Gadget
Create Labels in Gmail on Android Phone, A Guide to Email Organization
How to create labels in gmail on android phone – In the realm of email management, labels play a pivotal role, enabling users to bring order to the chaos of their inboxes. For those who navigate the digital world with Android phones, mastering the art of creating labels in Gmail is an invaluable skill.
Furthermore, Android’s flexibility allows for app downgrading, a useful feature when updates introduce unwanted changes. By following the steps outlined here , you can seamlessly revert to a previous app version. Additionally, pairing Bluetooth devices like the Sony WF-1000XM4 earbuds with Android devices is straightforward.
Consult this guide for detailed instructions on establishing a stable connection.
This comprehensive guide will delve into the intricacies of label creation, empowering you to organize your emails with ease and efficiency.
Gmail labels offer a myriad of benefits, including the ability to categorize emails based on topic, sender, or importance, ensuring that essential messages are always within reach. By harnessing the power of labels, you can streamline your email workflow, saving time and reducing stress.
Introduction
Labels in Gmail on Android phones are an essential tool for organizing and managing your emails. They allow you to categorize and group emails based on various criteria, making it easier to find, filter, and respond to specific messages.
Android’s vast capabilities extend beyond its user-friendly interface, offering hidden menus and advanced options. For instance, accessing the hidden menu on Android allows you to explore a wealth of diagnostic tools and information. Similarly, if you encounter difficulties opening EXE files on your Android device, refer to this guide for comprehensive instructions.
By using labels, you can streamline your workflow, save time, and improve your overall email management.
Creating Labels, How to create labels in gmail on android phone
To create a label in Gmail on an Android phone:
- Open the Gmail app and tap on the hamburger menu (three horizontal lines) in the top left corner.
- Scroll down and tap on “Settings”.
- Select “Labels”.
- Tap on the “+” icon in the bottom right corner.
- Enter a name for the label and tap on “Create”.
Managing Labels
Once you have created labels, you can manage them by:
- Editing:Tap on the label name to edit its properties, such as its name and color.
- Deleting:Tap and hold on a label to delete it.
- Applying:To apply a label to an email, open the email and tap on the label icon in the bottom right corner. You can select multiple labels to apply at once.
You can also use filters to automatically apply labels to emails based on specific criteria, such as sender, subject, or s.
Using Labels for Organization
Labels can be used to organize your emails in a variety of ways. Here are some tips:
- Create labels for different projects or clients.This makes it easy to find all emails related to a specific project or client.
- Use labels to track emails that require follow-up.You can create a label called “Follow-Up” and apply it to emails that you need to respond to or take action on.
- Use labels to filter out promotional or spam emails.You can create a label called “Promotions” and apply it to emails from promotional senders. This will help keep your inbox clean and organized.
Advanced Label Features
Gmail on Android phones also offers some advanced label features:
- Nested labels:You can create nested labels to organize your labels into a hierarchy. This can be useful for creating complex organizational structures.
- Color-coding:You can assign different colors to your labels to make them more visually appealing and easier to identify.
- Custom labels:You can create custom labels that are not available by default in Gmail. This gives you the flexibility to create labels that meet your specific needs.
Final Wrap-Up
In conclusion, creating labels in Gmail on Android phones is a transformative practice that empowers users to take control of their email inboxes. By leveraging the step-by-step instructions, tips, and advanced features Artikeld in this guide, you can harness the full potential of labels to organize your emails effectively, streamline your workflow, and enhance your overall productivity.
Query Resolution: How To Create Labels In Gmail On Android Phone
Can I create nested labels in Gmail on Android?
Yes, you can create nested labels to organize your emails hierarchically. Simply create a new label within an existing label.
How do I apply labels to multiple emails at once?
Select the emails you want to label, tap the “Labels” icon, and choose the desired labels. You can also use filters to automatically apply labels to incoming emails.
Can I color-code labels in Gmail on Android?
Yes, you can assign different colors to labels to make them visually distinct and easier to identify.


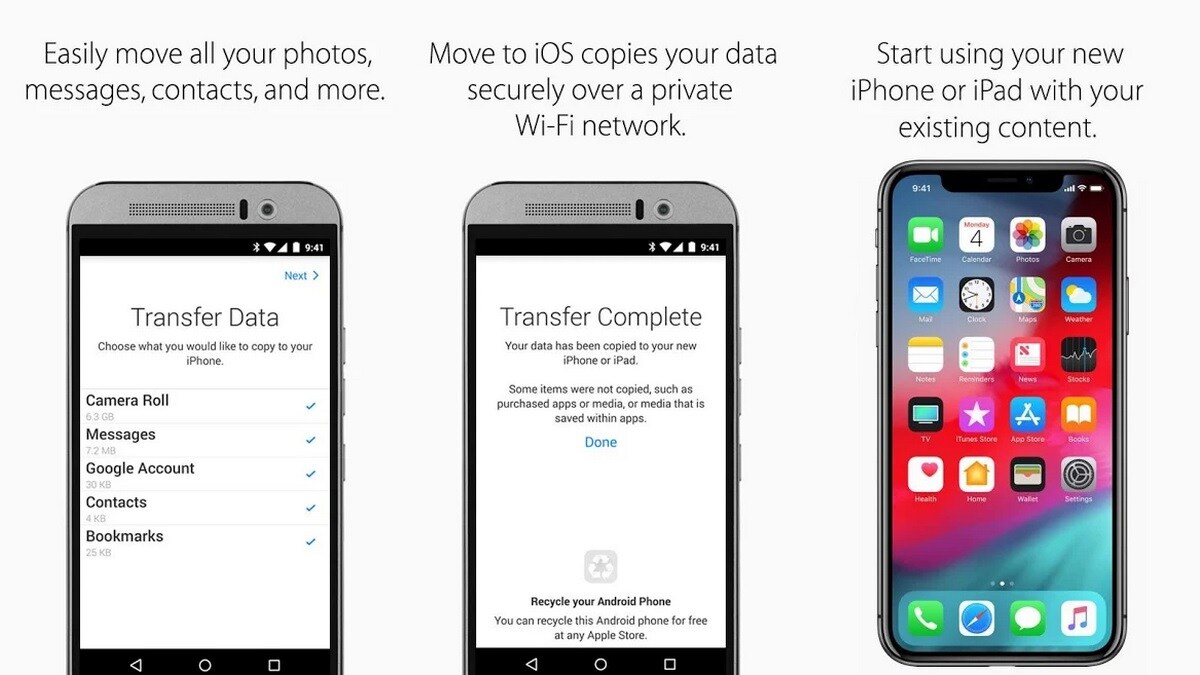
How transfer android contacts to iphone – Embark on a seamless journey of transferring contacts from Android to iPhone, as we delve into the complexities and intricacies of this process. This comprehensive guide will illuminate the path, empowering you with the knowledge and techniques to effortlessly migrate your valuable contacts between these mobile ecosystems.
Unlocking a PUK code on an Android device can be a daunting task. However, with the right approach, it becomes manageable. For a thorough understanding of the process, consult this helpful guide , which provides clear and concise instructions to assist you in regaining access to your device.
With the advent of smartphones, our contacts have become an indispensable part of our digital lives. However, transitioning from Android to iPhone can often present challenges in transferring these crucial connections. This article aims to alleviate these obstacles, providing a step-by-step roadmap to ensure a smooth and efficient transfer of your contacts.
Introduction: How Transfer Android Contacts To Iphone
The seamless transfer of contacts from Android to iPhone is crucial for maintaining communication and preserving valuable data. However, this process can be challenging due to differences in operating systems and file formats. This comprehensive guide aims to provide a detailed roadmap for transferring contacts from Android to iPhone, addressing common issues and offering practical tips to ensure a successful transfer.
Methods of Transfer
Google Drive
Google Drive offers a convenient and secure method for transferring contacts between Android and iPhone.
- On your Android device, export your contacts to a VCF file via Google Contacts.
- Upload the VCF file to your Google Drive.
- On your iPhone, import the VCF file from Google Drive to your Contacts app.
SIM Card
While a straightforward method, using a SIM card has limitations in terms of storage capacity and compatibility.
When encountering a plethora of open tabs on your Android device, a straightforward solution is at hand. Simply follow the steps outlined in this guide to effectively close them and regain control over your browsing experience.
- Export your contacts from your Android device to your SIM card.
- Insert the SIM card into your iPhone.
- Import the contacts from the SIM card to your iPhone’s Contacts app.
Third-Party Apps
Numerous reputable third-party apps facilitate contact transfer between Android and iPhone.
Consider factors such as app features, user reviews, and compatibility with your specific devices when selecting an app.
Troubleshooting Common Issues
Contacts Not Appearing on iPhone
- Ensure that the contacts are correctly exported from your Android device.
- Check if your iPhone’s iCloud account is active and syncing contacts.
- Restart both your Android and iPhone devices.
Duplicate Contacts
- Use the “Merge Contacts” feature in your iPhone’s Contacts app.
- Manually identify and delete duplicate entries.
Data Loss, How transfer android contacts to iphone
Always back up your contacts before transferring them to avoid potential data loss.
Additional Tips and Considerations
Transferring Contacts from Multiple Sources
Effortlessly Transfer Contacts from Android to iPhone, A Comprehensive Guide
Consolidate contacts from multiple Android devices or accounts into a single file before transferring.
Accessing iCloud photos on an Android device requires a reliable method of synchronization. By following the instructions provided in this informative guide , you can effortlessly bridge the gap between Apple and Android platforms and view your treasured memories across devices.
Selective Contact Transfer
Most transfer methods allow you to select specific contacts to transfer, rather than the entire contact list.
Contact Format Compatibility
Ensure that the contact file format (e.g., VCF) is compatible with both Android and iPhone.
Last Recap
Mastering the art of transferring contacts from Android to iPhone empowers you to maintain seamless communication across platforms. Whether you’re a seasoned tech enthusiast or a novice user, this guide has equipped you with the necessary knowledge and strategies to navigate this process with confidence.
Printing PDF documents from an Android phone is a convenient task made possible through the use of specialized apps. For detailed instructions, refer to this comprehensive tutorial , which provides step-by-step guidance to ensure a seamless printing process.
Embrace the convenience and flexibility of cross-platform contact management, and stay connected with your valuable contacts effortlessly.
Key Questions Answered
Can I transfer contacts from multiple Android devices to my iPhone?
Yes, you can use Google Drive or third-party apps to consolidate contacts from multiple Android devices and transfer them to your iPhone.
How do I avoid duplicate contacts after transferring?
Before transferring, merge or delete duplicate contacts on your Android device. You can also use the “Merge Duplicates” feature in your iPhone’s Contacts app after importing.
What should I do if my contacts don’t appear on my iPhone after transferring?
Check your iCloud settings to ensure that Contacts is enabled for syncing. Additionally, verify that you’re signed in to the correct iCloud account on your iPhone.

How to watch ted lasso on android – Immerse yourself in the heartwarming and hilarious world of Ted Lasso, now available on your Android device. This comprehensive guide will walk you through the streaming options, device compatibility, and troubleshooting tips, ensuring a seamless viewing experience.
Streaming Options
Ted Lasso is available to stream on multiple platforms, each with its own subscription options and features.
To minimize distractions while driving, consider disabling Amber Alerts on your Android phone. A step-by-step guide on turning off Amber Alerts can be found here. Furthermore, if you’re concerned about data consumption, disabling auto-updates on your Android device is recommended.
Detailed instructions for turning off auto-updates are available here.
| Streaming Service | Subscription Required | Cost | Features |
|---|---|---|---|
| Apple TV+ | Yes | $4.99/month | Offline viewing, 4K resolution, Dolby Vision |
| Amazon Prime Video | Yes (via Prime subscription) | $14.99/month | Offline viewing, 4K resolution, X-Ray feature |
| Google Play Movies & TV | Yes (via purchase or rental) | $12.99/episode | Offline viewing, HD resolution |
| YouTube TV | Yes | $64.99/month | Live TV streaming, cloud DVR, offline viewing |
Device Compatibility
How to Watch Ted Lasso on Android, A Comprehensive Guide
Ted Lasso is compatible with a wide range of Android devices, including smartphones, tablets, and TVs. To ensure compatibility, your device should meet the following requirements:
- Android version 5.0 or later
- Stable internet connection
- Supported streaming service app installed
For optimal viewing experience, it is recommended to use a device with a high-resolution display and fast processor.
Downloading Options
Downloading Ted Lasso episodes for offline viewing is available on certain streaming services.
- Apple TV+:Episodes can be downloaded for offline viewing on supported devices.
- Amazon Prime Video:Episodes can be downloaded for offline viewing on supported devices, but may require a Prime subscription.
- Google Play Movies & TV:Episodes can be downloaded for offline viewing after purchase or rental.
- YouTube TV:Episodes can be recorded using the cloud DVR feature, but may require a subscription.
To download episodes, simply navigate to the episode you want to download within the streaming service app and look for the download option.
For enhanced security, consider installing an SSL certificate on your Android phone. Detailed instructions can be found here. Additionally, if you’re experiencing display issues, enabling MHL on your Android device may resolve them. Instructions for enabling MHL are available here.
Troubleshooting
If you encounter any issues while watching Ted Lasso on Android, try the following troubleshooting steps:
- Check your internet connection:Ensure that your device has a stable internet connection.
- Update the streaming service app:Make sure you have the latest version of the streaming service app installed.
- Restart your device:Sometimes, a simple restart can resolve minor issues.
- Clear the app cache:Go to your device’s Settings > Apps > Streaming service app > Storage and clear the cache.
- Contact the streaming service:If you continue to experience issues, contact the streaming service’s customer support for assistance.
Tips and Tricks
Here are some tips and tricks to enhance your viewing experience on Android:
- Adjust video quality:Most streaming services allow you to adjust the video quality to optimize for your internet speed and device.
- Enable subtitles or closed captions:This can be helpful for improving comprehension or accessibility.
- Use headphones or earbuds:For a more immersive experience, consider using headphones or earbuds.
- Minimize data usage:If you’re on a limited data plan, consider downloading episodes for offline viewing or adjusting the video quality to a lower resolution.
- Optimize battery life:To extend battery life while streaming, close unnecessary apps and reduce screen brightness.
Epilogue

How to Watch Ted Lasso on Android, A Comprehensive Guide
Whether you’re a seasoned Ted Lasso fan or just discovering its charm, this guide empowers you to enjoy every episode with ease. With the right streaming service, compatible device, and troubleshooting know-how, you can bring the beloved AFC Richmond coach into your Android world.
Detailed FAQs: How To Watch Ted Lasso On Android
Can I download Ted Lasso episodes for offline viewing?
Additionally, understanding how to disable automatic updates on Android devices can be beneficial for conserving data usage and preventing unwanted app installations. Detailed instructions on how to turn off auto update in android are available online, providing step-by-step guidance on navigating the device’s settings and configuring update preferences.
Yes, you can download Ted Lasso episodes for offline viewing using the Apple TV+ app on your Android device.
What are the minimum device requirements for streaming Ted Lasso on Android?
You’ll need an Android device running Android 5.0 or later to stream Ted Lasso.
What streaming services offer Ted Lasso?
Ted Lasso is exclusively available on Apple TV+.
How to view learned words on android – In the realm of language learning, reviewing learned words is paramount to solidifying comprehension and expanding vocabulary. With Android devices at our fingertips, there’s a plethora of ways to access and review learned words, empowering us to enhance our linguistic skills effortlessly.
Embark on this detailed exploration to discover the various methods and techniques for viewing learned words on Android.
Navigating the vast photo gallery on an Android device can be a daunting task. Fortunately, the platform offers a convenient solution: creating photo albums. This enables users to organize and categorize their precious memories, making it easy to find specific images.
A comprehensive guide to creating photo albums on Android can be found at this link.
From leveraging language learning apps to utilizing browser extensions, creating custom vocabulary lists, and integrating vocabulary review into our daily routines, this guide provides a comprehensive overview of the tools and strategies available. By embracing the power of Android devices, we can transform vocabulary learning into an engaging and effective endeavor.
Adjusting the brightness on an Android phone is crucial for ensuring optimal screen visibility in various lighting conditions. Whether it’s dimming the display for nighttime use or increasing brightness for outdoor environments, the process is straightforward. A detailed guide on how to change brightness on Android phones can be found at this link.
Cara Melihat Kata-kata yang Dipelajari di Android
Memeriksa kembali kata-kata yang dipelajari secara teratur sangat penting untuk memperkuat ingatan dan meningkatkan kefasihan berbahasa. Artikel ini akan mengulas berbagai cara untuk melihat kata-kata yang dipelajari di perangkat Android, mulai dari aplikasi pembelajaran bahasa hingga ekstensi browser dan daftar kustom.
Mengidentifikasi Kata-kata yang Dipelajari di Android, How to view learned words on android
Ada beberapa cara untuk mengidentifikasi kata-kata yang dipelajari di perangkat Android:
- Aplikasi Pembelajaran Bahasa:Banyak aplikasi pembelajaran bahasa melacak kata-kata yang telah dipelajari pengguna dan menyediakan cara untuk meninjaunya.
- Daftar Kosakata Tersimpan:Beberapa aplikasi dan situs web memungkinkan pengguna menyimpan daftar kosakata mereka sendiri, yang dapat diakses dan ditinjau kapan saja.
- Catatan dan Pengingat:Pengguna dapat membuat catatan atau pengingat untuk menyimpan kata-kata yang dipelajari dan meninjaunya secara teratur.
Meninjau kata-kata yang dipelajari secara teratur sangat bermanfaat karena membantu memperkuat ingatan, meningkatkan pengucapan, dan membangun kefasihan.
Menggunakan Aplikasi Pembelajaran Bahasa
Banyak aplikasi pembelajaran bahasa menawarkan fitur untuk melihat kata-kata yang dipelajari. Beberapa aplikasi populer meliputi:
- Duolingo
- Babbel
- Rosetta Stone
- Busuu
- Memrise
Aplikasi ini biasanya memiliki bagian khusus di mana pengguna dapat mengakses daftar kata-kata yang telah mereka pelajari. Daftar ini dapat disusun berdasarkan topik, level kesulitan, atau tanggal dipelajari.
Losing track of AirPods can be a frustrating experience. Fortunately, Android users can utilize a method to locate their missing earbuds. By following a simple procedure, users can easily find their AirPods and resume their audio enjoyment. A comprehensive guide to finding lost AirPods on Android can be found here.
Outcome Summary
In conclusion, viewing learned words on Android is a multifaceted process that can be tailored to individual learning styles and preferences. By harnessing the capabilities of Android devices, language learners can effectively review and reinforce their vocabulary, unlocking new linguistic horizons and enhancing their communication abilities.
Helpful Answers: How To View Learned Words On Android
Can I view learned words offline on Android?
Android devices offer a privacy-oriented feature known as “secret mode.” This mode allows users to browse the web anonymously, leaving no trace of their activities. However, when it’s no longer needed, it’s essential to disable secret mode. A step-by-step guide to turning off secret mode on Android can be found here.
Yes, many language learning apps and flashcard apps offer offline access to learned words, allowing you to review vocabulary even without an internet connection.
How often should I review learned words?
Regular review is crucial for retention. Aim to review learned words at least once a day, and increase the interval between reviews as you become more familiar with the vocabulary.
Can I create my own custom vocabulary lists on Android?
Yes, several apps allow you to create and manage custom vocabulary lists, enabling you to organize and categorize learned words based on specific topics or themes.

Effortlessly Transfer Contacts from Android to iPhone, A Comprehensive Guide

How to Watch Ted Lasso on Android, A Comprehensive Guide
How to View Learned Words on Android, A Comprehensive Guide
Remove Meta AI from WhatsApp Android, A Comprehensive Guide
Hoyoplay Download, A Comprehensive Guide to Downloading Games
Unlocking Your Android Phone, A Comprehensive Guide to Checking Status and Navigating Pros and Cons
-
Gadget8 months ago
Remove Meta AI from WhatsApp Android, A Comprehensive Guide
-
Games8 months ago
Hoyoplay Download, A Comprehensive Guide to Downloading Games
-
Gadget8 months ago
Unlocking Your Android Phone, A Comprehensive Guide to Checking Status and Navigating Pros and Cons
-
Gadget7 months ago
Unveiling Your Digital Footprint, A Comprehensive Guide to Viewing History on Android
-
Gadget8 months ago
How to Play Pokémon Infinite Fusion on Android, A Comprehensive Guide to Endless Fusion and Evolution
-
Gadget8 months ago
How to Know If an Android Blocked You on iPhone, Unraveling the Signs
-
Games8 months ago
Elden Ring Walkthrough, A Comprehensive Guide to Conquer the Lands Between
-
Gadget8 months ago
How to Run EXE Files on Android, A Comprehensive Guide